Passenger car
Driving school
theory book
to category B
Sections 9.1 - 9.5: Manoeuvres on the driving technology facility
How the car reacts
At the driving centre, you will have the opportunity to experience how speed affects steering and braking. The idea is that these manoeuvres will give you a better sense of how the car reacts in different situations. It's important that you realise that speed alone can determine whether a manoeuvre is successful or not.
The exercises at the driving centre should not be performed at speeds higher than 70 km/h. During the exercises, you are alone in the car.
This section contains both theory and preparation for the exercises at the driving centre. As with section 2, you can use this section as a preparation, but there may also be opportunities for additional exercises and modifications when you arrive at the driving centre, but your instructor will have this covered.
Grip and loading
Traction
As you read in section 5, traction is a measure of how well the car stays on the road. The power of the engine, brakes and steering movements can only be utilised through grip. Therefore, traction is important for all acceleration, braking and steering.
When the road is slippery due to snow, ice or wet and greasy conditions, traction is reduced and therefore you need to be careful when operating the accelerator, clutch, brake and steering wheel. At the same time, it is important that you maintain a suitably low speed. Traction can be significantly improved by using winter tyres when driving on snow-covered roads.
Loading
A car can be so heavily loaded at the rear that the pressure of the front wheels on the road is reduced. Firstly, this can lead to an oversteering tendency. Secondly, it reduces traction and reduces the ability to steer the car. But reduced grip also means that a front-wheel drive car accelerates slower (engine power is not utilised properly due to wheel spin) and that the wheels may lock early if you brake. In both situations, the car cannot be steered when you turn the steering wheel.
Improper loading of the vehicle causes a significant change in the position of the centre of gravity. There is an increased risk of tipping over, especially if goods and cargo in the roof box are incorrectly positioned.
If the tyre pressure is too high or too low, the tyre's contact with the road changes, which in turn changes the car's steering characteristics.

Normal tyre pressure.

Too high tyre pressure.
Too low tyre pressure.

A worn tyre tread pattern greatly reduces grip in wet conditions. If you drive in heavy rain or through puddles, there is a risk of aquaplaning. Even with brand new tyres, aquaplaning can occur if the tread is unable to displace water.
Speed, braking distance and traction
Motion energy
When a car is set in motion, it receives a certain amount of energy called kinetic energy. This kinetic energy allows the car to continue travelling some distance even if the engine is not pulling because the clutch is down or the car is in neutral.
There is a strong correlation between speed and kinetic energy. If you double the speed, the kinetic energy quadruples. In other words, it takes four times as much force to stop the car when you double the speed - and that also means a quadrupling of the braking distance. With the brakes, you can shorten the distance the car can travel on its own using kinetic energy. The kinetic energy is converted into heat in the brakes when braking. In a collision, however, kinetic energy is converted into damage to the person and the vehicle. The damage increases significantly as speed increases.
Centrifugal force
When you drive through a corner or make an evasive manoeuvre, the car is affected by a transverse force that will try to "pull" the car out of the curve of the corner. This force is called centrifugal force. There is a relationship between speed and centrifugal force that means that a doubling of speed will quadruple the centrifugal force. In other words, it only takes a small increase in speed to make it much harder to steer correctly through the turn.
Approximately 25 accidents per year.
Halving the curve radius (i.e. a turn twice as sharp) will double the centrifugal force. Doubling the curve radius (i.e. half as sharp a turn) will halve the
centrifugal force. These conditions are of great importance, especially when driving with high bodies (e.g. van or car with roof box). When driving with too high
speed with such vehicles on curves, there will be an increased risk of rollover.
Brake lengths
Braking distance is the distance the car travels from when you step on the brake pedal and start braking until the car comes to a stop.
In the following, you will learn something about braking distances, which you will later experience on your own at the driving school.
Braking distance depends, among other things, on how hard you press the brake pedal. If you are travelling at 60 km/h. on a level, dry road, the braking distance is approx. 50 metres if you brake gently, approx. 30 metres if you brake quite hard, approx. 20 metres if you brake very hard and approx. 17 metres if you make an emergency stop.

If you increase your speed just a little bit, it has a big impact on braking distance. It almost doubles if you increase your speed from 30 to 40 km/h, from 60 to 80 km/h. or from 80 to 110 km/h. Doubling the speed will quadruple the braking distance.
The braking distance also depends on the road grip and thus on the road surface on which braking takes place.
A braking distance of approx. 35 metres can be achieved at 80 km/h. on a level, dry road - without the wheels locking.
To achieve a braking distance of 35 metres, the speed must not exceed 60 km/h on wet asphalt or gravel, 40 km/h. on firm snow and 30 km/h. on ice.
On a good road surface, the braking distance for an ordinary passenger car at 30 km/h must not exceed 6 m. For a van at the same speed and with a maximum gross weight of 3,500 kg, it must not exceed 7 m. This is the minimum legal requirement, but good brakes can almost halve the braking distance. With a legal handbrake, the braking distance at 30 km/h must not exceed 20 metres.
Braking distance increases when travelling downhill.
Braking distance exercises
The following exercises take place on a dry road surface at approx. 60 km/h.
- Brake gently to achieve a braking distance of approximately 50 metres.
- Brake quite hard to achieve a braking distance of about 30 metres.
- Brake very hard to achieve a braking distance of approximately 20 metres.
- Perform emergency braking.
Traction utilisation
What follows is a combination of theory and practice.
To avoid wheel lock (i.e. wheels that don't rotate) when braking on a slippery road surface, only lightly press the brake pedal. Locked wheels increase braking distance.
Newer cars have ABS brakes. ABS brakes are anti-lock because the braking system keeps the wheels turning (rotating) even when the brake pedal is pressed hard. When the system is in operation, there is a strong vibration in the brake pedal, but you must keep the pedal pressure as long as braking is required.
In a car without ABS brakes, it's up to you to adjust the pressure on the brake pedal to keep the wheels rotating for the best possible braking.
Braking with one pair of wheels on a dry part of the road and the other pair on a wet part can cause the car to skid violently. Skidding can also occur for cars with ABS braking systems.
Most new cars are equipped with Electronic Stability Control (ESC)/ Electronic Stability Programme (ESP), which can counteract skidding or rollover. Cars with ESC are equipped with sensors that detect the car's movement in all directions. When the system detects that a skid is coming, one or more wheels are braked for a shorter or longer period of time to straighten the car.

If you turn sharply on a slippery road surface, you may find that the car does not follow the steering wheel's movements, but even heavy braking or acceleration in a corner on a slippery road surface can cause the car to not stay on course through the corner.
Practise utilising the grip of the road
On a dry road surface:
Brake at around 60 km/h. and adjust the pressure on the brake pedal to minimise the braking distance - without wheel lock or skidding.
On a slippery road surface:
- Start without wheel spin or skidding - brake in the shortest possible distance at gradually increasing speeds up to around 50 km/h.
- Adjust your speed to give you the same braking distance as on a dry road, approximately 20 metres.
On a dry/slick road surface (uneven friction):
With one pair of tyres on a dry part of the road and the other pair on a smooth part of the road, brake at gradually increasing speeds. Adjust the pressure on the brake pedal to avoid skidding. Correct the steering if the car is skidding.
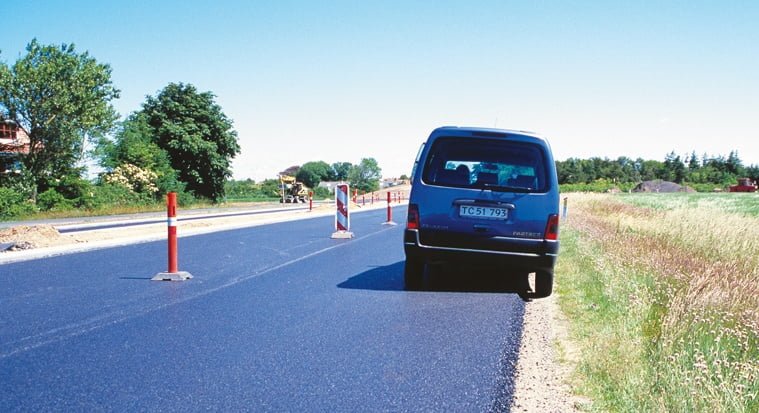
Obstacles on the roadway
You need to learn how to react correctly to sudden obstacles ahead. Again, during these exercises you will find out how much to reduce speed on a slippery road compared to a dry road.
Slalom
On a dry road surface:
At an appropriate speed (50 km/h), slalom between 5-7 cones 15-20 metres apart. The impact on the car should be minimised and the steering should be done in such a way that the car settles between each turn. You should realise the importance of sitting correctly in the seat and in relation to the steering wheel.
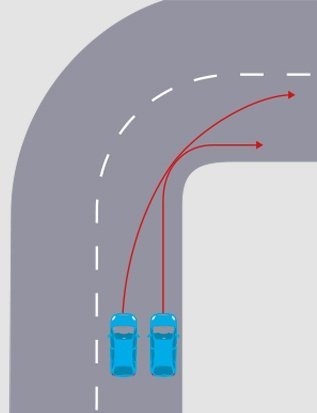
Double avoidance manoeuvre without braking
On a dry road surface:
At 50-60 km/h. you make a lane change to avoid driving into a marked obstacle. Once you have passed the obstacle, quickly switch back to the original lane.
On a slippery road surface:
At an appropriate speed, you make a lane change to avoid hitting a marked obstacle. Once you have passed the obstacle, quickly change back to the original lane. This exercise will teach you to judge how much to reduce your speed on a slippery road to avoid hitting an obstacle.
The exercise set-up should be the same as on a regular road.
Combined braking and avoidance manoeuvre
On a dry road surface:
At 70 km/h. brake - without locking your wheels - so close to a marked obstacle that you have no chance of stopping. Release the brake pedal, steer past the obstacle and brake to a stop.
On a slippery road surface:
At a suitable speed (to be determined by you), brake - without locking your wheels - so close to a marked obstacle that you have no chance of stopping. Release the brake pedal, steer past the obstacle and brake to a stop.
The exercise set-up should be the same as on a regular road.
Regaining traction after skidding
When skidding, never use the brake or accelerator - it will only make the skid worse. The following exercises take place on a slippery road surface and are designed to familiarise you with the correct operation of the car and give you some skill in performing them.
Driving in curves
On a slippery road surface:
You will experience the importance of speed when travelling around bends with different radii.
Rear wheel skidding
On a slippery road:
As the rear wheel slides out, depress the clutch pedal and hold it there for the entire alignment. Turn the steering wheel back in the original direction of travel, i.e. to the same side as the rear end of the car slides out. When the rear end straightens up, turn the steering wheel back to straight ahead, otherwise you risk another skid to the opposite side.
Once the car has regained traction and is back on course, slowly lift the clutch while gently accelerating.
The exercise is carried out without an ESC system connected.
Front tyre slippage
On a slippery road through a bend:
As the front tyres slip out, turn the front wheels towards the straight-ahead position while depressing the clutch pedal. Hold it down while you straighten up.
When the car follows the steering wheel again, continue in an arc that is as flat as possible, taking into account the shape of the bend.
The exercise is carried out without an ESC system connected.
Maintain control after driving over a high kerb
You can easily lose control if you accidentally drive over a high kerb. This causes many people to panic and turn the steering wheel sharply. If you do this, your car can easily veer into the oncoming lane or ditch.
Back again over the high kerb
The exercise, which takes place on a dry road surface at gradually increasing speeds (40-60 km/h), is designed to teach you how to react correctly.
- Drive over a high kerb
- Reduce speed by braking gently and steering the car straight ahead along the edge
- Only steer back over the edge when your speed is low enough to do so safely.
- If conditions allow, you should also perform the exercise with the high edge on the left side.
When you've driven on the technical driving course, you've learnt about the forces that affect the car under different conditions. You've experienced that even a small increase in speed can be enough to prevent you from completing every manoeuvre. You've also learnt that it's important to master the right driving technique to be able to handle a critical situation. But not least to avoid creating critical situations for you and other road users.
The lessons at the driving centre will give you a good feel for the car, and it's a good idea to refresh your techniques on a regular basis to keep your driving skills up to date. But no matter how good you become, remember that there are some rules of physics that you can't break and that speed is one of the elements you need to respect!
Test your knowledge
Cat. B - Sections 9.1 - 9.5
Select the questions you think are the right ones.